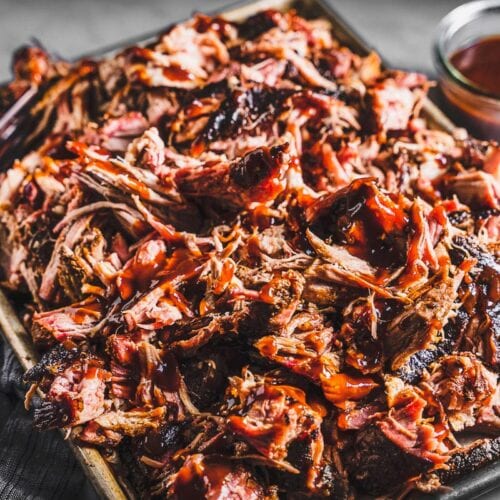
There’s nothing like the mouthwatering smells and tastes of perfectly cooked pulled pork. The fall-apart tender texture and rich pork flavor is unmistakable and so satisfying. It’s one of the easiest least expensive ways to feed a hungry crowd, and it is guaranteed to be a hit.
We’ll dry brine the pork butt ahead of time for maximum flavor, then we’ll make it easy to cook, indoors or out, with three easy-to-follow options for how to cook it. Get ready to make the best pulled pork you have ever had. With a homemade dry rub and BBQ sauce, this is so flavorful and perhaps even better the next day as leftovers.
Table of Contents
5 Keys for the Best Pulled Pork
- Dry Brine It Overnight – Season the pork shoulder 24 to 48 hours ahead of time with plenty of kosher salt and a dry rub to give it flavor all the way through.
- Choose Your Cooking Method – See the pros and cons below of going with the smoker, slow cooker (aka Crockpot) or in the oven.
- Cook It Low and Slow – The target 203° F internal temperature is the magic number for the perfect melt-in-your-mouth texture we’re going for.
- Shred the Pork While It’s Still Warm – After a 1-hour rest and right before serving, get shredding. Then keep it covered and warm so it stays juicy.
- Sauce It Up – Make a quick and simple homemade sauce that you can combine with the pulled pork and serve on the side.
What You’ll Need
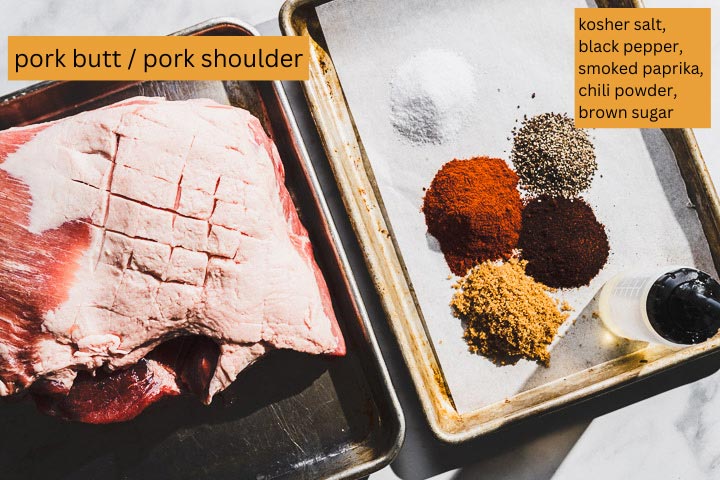
- Pork Shoulder/Pork Butt/Boston Butt – Either boneless or bone-in will both work, and 4 to 8 pounds. Pork shoulder is the lower portion of the front shoulder of the pig, while pork butt, aka Boston butt, is the upper portion.
Boneless is all meat (you’re not paying for bone) and cooks slightly quicker but a bit less evenly. Bone-in holds together nicely and cooks more evenly. Once fully cooked, the bone will pull right out of the meat. - Salt – I like to use Diamond Crystal brand kosher salt and use 1 teaspoon per pound of pork, or use ½ teaspoon of Morton brand kosher salt per pound.
- Dry Rub – You’ll combine the salt with brown sugar, smoked paprika, dark chili powder, black pepper and any other spices or dried aromatics you like.
- Canola Oil – This helps the dry rub stick and is used to sear the pulled pork before using the Crockpot method.
- Plastic Wrap – Used to cover during the dry brine.
- Probe Thermometer – A remote probe thermometer will let you know when the pork has reached the desired target temperature. Use an instant-read meat thermometer to spot check towards the end of the cook.
- Aluminum Foil – Used to wrap the pork after it reaches 165° F when cooking it in the smoker or oven. It’s not needed when cooking in a Crockpot.
Jump down to the recipe card for specific quantities.
3 Ways to Make Pulled Pork
The best way to make pulled pork depends on the tools and time you have. The smoker, Crockpot and oven each deliver fantastic results, with their own advantages and disadvantages.
The ultimate method is definitely in the smoker, but it’s also the most involved. The easiest by far is in the Crockpot or slow cooker, which makes super juicy, tender pulled pork, but with a little less flavor. The oven is right in the middle, where we treat the oven like a smoker without the smoke.
| Method | Pros | Cons |
| Smoker | – The most flavor – Best bark | – Most hands-on – Easiest to undercook |
| Slow Cooker/Crockpot | – Easiest hands-off method – One main vessel for cooking and serving – Juiciest method | – Less flavor/bark – Easiest to overcook – No smoke flavor |
| Oven | – Good bark and flavor – Relatively simple | – Can be tricky if your oven doesn’t go below 275° F – No smoke flavor |
Additional Methods: An Instant Pot or pressure cooker is super-fast but will have the least amount of flavor. Sous vide makes for super flavorful pulled pork when you first cook it sous vide and then finish it in the smoker.
How Much Pulled Pork Do You Need Per Person?
Figure 1/3 to 1/2 pound (about 8 ounces) of cooked meat per person. As the pork cooks, it will lose a good amount of weight (30 to 40%) through water evaporation and fat dripping off. So, at the butcher I figure on 3/4 pound (12 ounces) of uncooked meat per person.
An 8-pound boneless pork butt will yield 5 pounds of pulled pork, easily feeding 10 to 12 people. This should still leave you enough for leftovers, which are the best!
Bone-in pork butts obviously have less meat because of the weight of the bone (they are usually less expensive per pound). When I get bone-in, I assume the bone weighs about a pound (though that’s probably high; I’ve never weighed one).
Tip: Buy a larger roast than you need so you have extra for leftovers. When in doubt, buy larger.
How to Make Pulled Pork
Let’s go step-by-step for how to make the best pulled pork. Start with a 24-hour dry brine and choose your cooking method (smoker, slow cooker or oven) to do the rest.
If you’re shooting for the easiest: Go with the Crockpot. If you want the maximum flavor, the smoker is the best choice. No matter which option you go with, the goal is to cook it low and slow until the internal temperature reaches 203° F, which is perfect for shredding.
Prep and Dry Brine
The dry brine is crucial for the juiciest, maximum flavorful pulled pork. We need to give it ample time for the salt to draw the juices out of the meat, and then for the salt and other seasonings to be reabsorbed back in. A full 24 to 48 hours with the dry brine is best, if possible.
If you don’t have time to dry brine that long, then season it at least 45 minutes prior to cooking.
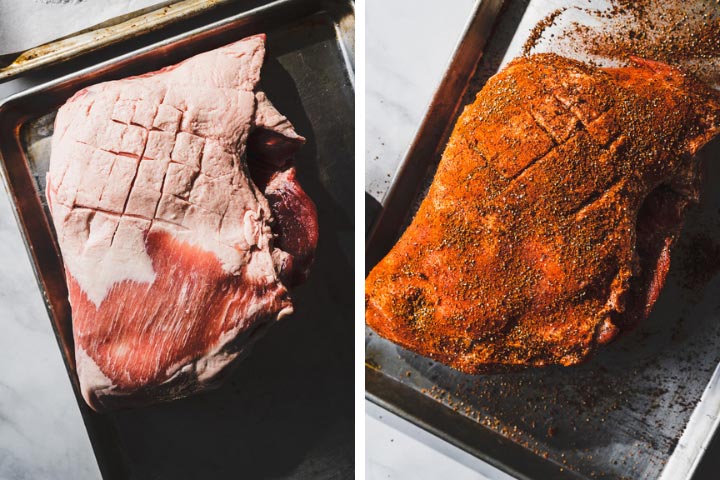
- Score the Fat Cap – Slice a 1-inch crosshatch pattern using a sharp knife.
- Make the Rub – Combine the salt and all the spices in a small bowl.
- Pat Dry – Place it on a sheet pan and dry the pork roast with paper towels, then drizzle on a little canola oil to help the rub stick.
- Rub It In – Sprinkle the dry rub over all the surfaces and in the crevices. Start with the bottom side and the top (presentation side) last.
- Dry Brine – Cover and refrigerate for 24 to 48 hours.
- Temper – Remove the pork from the refrigerator about 1 hour before cooking to allow the temperature to rise closer to room temperature.
Using a Smoker
The smoker makes the most flavorful pulled pork with the best bark.
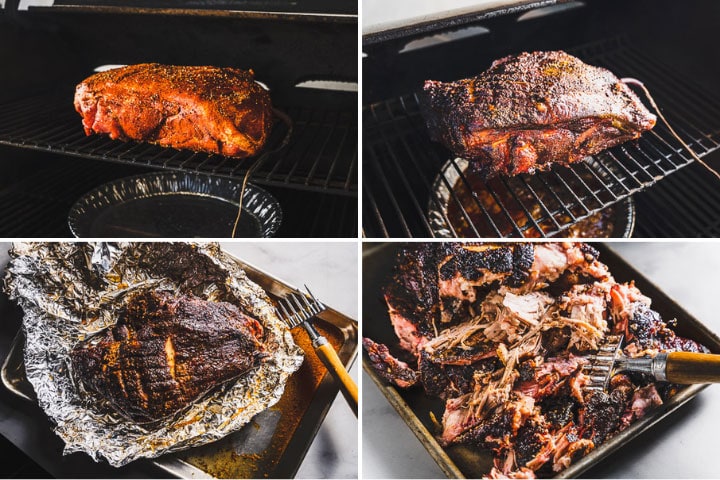
- Smoker Setup – Preheat your smoker to 250° F and set up for indirect heat cooking with apple or cherry wood for smoke and a drip pan filled with water in place, according to the manufacturer’s instructions.
- Cook – Place the pork in the smoker, fat side up, and cook until the internal temperature reaches 165° F. Wrap the pork tightly with aluminum foil, then place back in the smoker and continue to cook until the internal temperature reaches 203° F.
- Rest – Once the desired temperature is reached, remove from the smoker and rest for 1 hour still wrapped in foil.
Go deeper on making Smoked Pork Shoulder >
Using a Slow Cooker/Crockpot
This is the easiest method for making pulled pork.
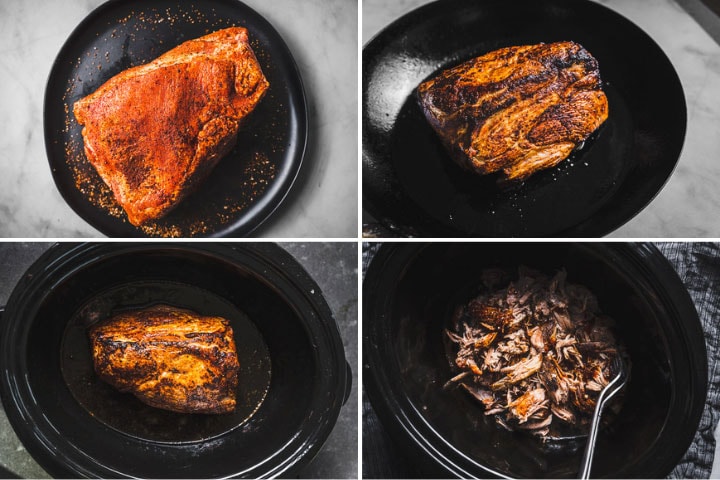
- Sear – Preheat a large heavy skillet over medium-high heat with a drizzle of canola oil. Sear all sides of the pork roast for about 2 minutes each, being careful not to let it burn.
- Slow Cook – Place the seared pork butt in the Crockpot, cover with the lid and turn on to the low setting. Cook until the internal temperature reaches 203° F, 5 to 8 hours, depending on the size of your roast.
Using the Oven
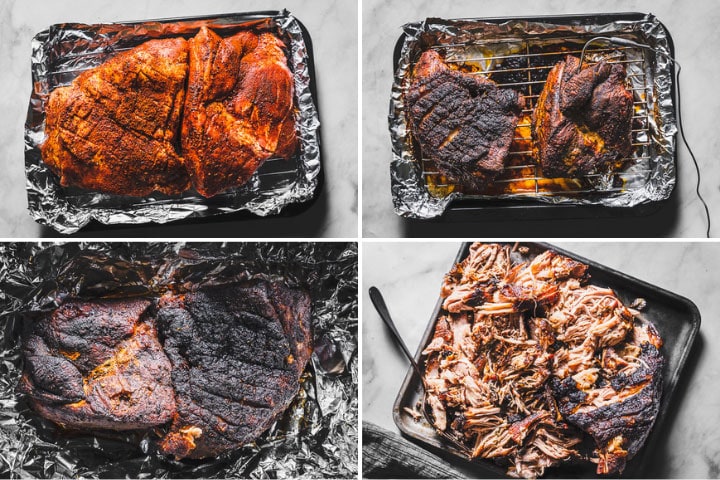
- Preheat Oven – Preheat your oven to 250° F (or as low as your oven will go) with the rack in the lower-middle position. Line a baking sheet with foil and use a rack. Place the pork fat cap side up.
- Cook – Place the pork in the oven and cook until the internal temperature reaches 165° F. Cover the pork tightly with aluminum foil, then place back in the oven and continue to cook until the internal temperature reaches 203° F.
- Rest – Once the desired temperature is reached, remove from the oven and rest for 1 hour still wrapped in foil.
The Simple BBQ Sauce
A barbecue sauce is essential for pulled pork. It’s so easy to make your own with a few simple ingredients. This one is a little sweet, with some tartness from the cider vinegar and some heat from the hot sauce.
You can modify the quantities to make it exactly how you want. If you already have a favorite sauce in your pantry, you can definitely use that.
- Ketchup – The base to our BBQ sauce. I prefer Heinz brand.
- Molasses – Adds a rich, caramel sweetness to the sauce.
- Worcestershire Sauce – Salty and savory.
- Cider Vinegar – Brightens up the sauce with acidity. You can substitute lemon juice or even white vinegar.
- Hot Sauce – Optional. Any type will work to spice things up. You can also use some cayenne pepper instead. Add it slowly, as the sauce can get spicy quickly.
- Brown Sugar – Gotta have some sweet to balance out the heat and acidity.
- Liquid Smoke – Optional, if you want to add some smokiness to the sauce, which pairs wonderfully with the pork.
- More Add-ins – If you wish, additional spices such as granulated garlic and onion can be added along with the essentials.
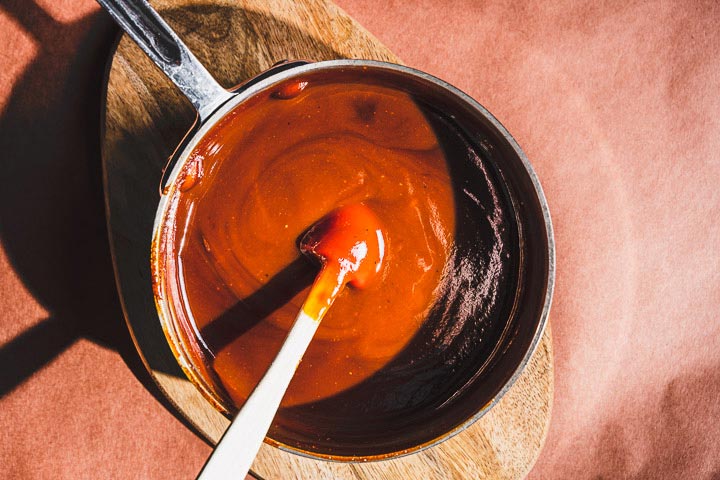
Make the sauce by simply combining all ingredients in a small saucepan over medium-low heat and simmering until it thickens, stirring frequently. About 10 to 15 minutes total.
Shredding for “Pulled Pork”
Once the cooking is done, it’s time to get your hands dirty. Wear nitrile gloves for easy cleanup.
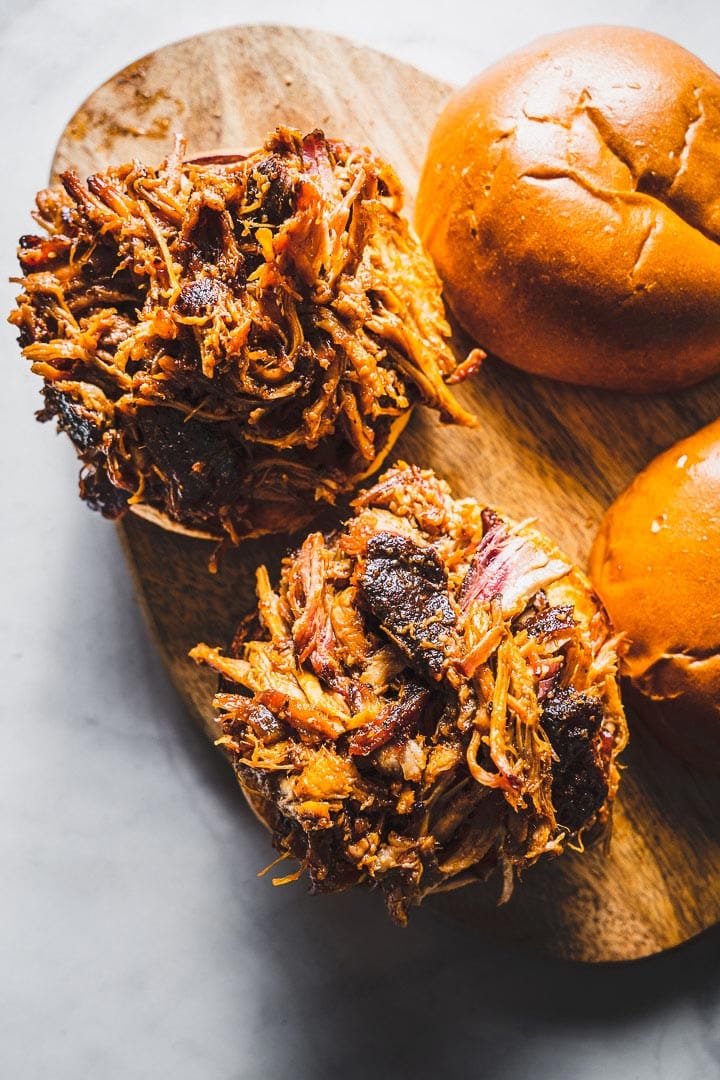
- Pull the Pork – Using two forks, shred the tender pork. Pull apart the strands, combining the flavorful bark with the tender inside meat.
- Add Sauce – Mix in the desired amount of BBQ sauce, cover and keep warm until serving.
Tip: If the pulled pork dries out, you can mix in a little leftover pan juices.
Pro Tips for Success
- Shred When It’s Warm. Use nitrile gloves and shred the pork after resting when it is still warm. It will be much easier to do than when it cools.
- Cook It Low and Slow – Cooking quickly with high heat will result in dry, tough meat. Cooking it low and slow breaks down the fat and tissue, so it is super tender.
- Keep It Warm – No matter the cooking method you use, you can keep the pulled pork warm in a Crockpot for serving. You can also keep it in a low oven or wrapped in a cooler.
- Don’t Trim Off All the Fat – Fat is what gives flavor and is the best part of the bark that you mix into the rest.
- Don’t Skip the Rest – Resting the cooked pork will relax the meat, allowing the juices to redistribute. It will also cool enough to be able to handle.
- Don’t Over-Sauce – Add just enough sauce to the pulled pork and let people add more on top.
- Speed Up the Cook – While a large pork shoulder takes a long time to cook, you can speed up the cook by halving or quartering the roast. This works especially well with the slow cooker version but is less desirable for the smoker but works if you are under time constraints.
- Don’t Undercook – Make sure you use a probe thermometer to test for doneness in the thickest part of the pork.
Frequently Asked Questions
The best cut of meat for pulled pork is the pork butt or the pork shoulder. This cut of pork comes from the shoulder of the pig and has a lot of fat marbling, as well as a protective and flavorful fat layer on the top. It is perfect for low and slow cooking methods to make pulled pork.
The best way to tell when the pulled pork is done is by testing it with a probe meat thermometer. The temperature should register between 200-205° F, with 203° F being the “perfect doneness.”
Another way to tell is by checking the tenderness of the texture. It should easily pull apart with a fork.
What temp is pulled pork done? 203° F
The best method for cooking pulled pork is by cooking it at a low temperature very slowly over a period of time. Depending on the tools you have available, cooking the pork in the smoker will by far give the best bark and flavor, but it is more hands-on. The easiest method is in the Crockpot. In the middle is to use the oven, which gives a nice flavor on the bark and no special equipment is required.
Storing and Reheating
How to Store Pulled Pork
- In the Refrigerator: Store leftovers by first cooling to room temperature, then cover tightly with plastic wrap or in a food container and keep in the refrigerator for up to 4 days.
- In the Freezer – Pulled pork is very freezer friendly. Shred it while it is warm, place in vacuum-sealed or freezer bags and freeze for up to 3 months. Defrost by placing a bag in a water bath until defrosted before reheating.
Reheating Pulled Pork
There are a few great ways to reheat your pulled pork for serving, including in a skillet on the stove, in the oven and even in the microwave. The skillet is my favorite method because it allows you to crisp up the pulled pork, which enriches the flavor and adds a great crispy texture.
- In a Skillet: Heat a large skillet over medium heat, add the desired amount of pulled pork and stir frequently until it is warmed through. You can add some BBQ sauce to the skillet to jazz it up.
- In the Oven: Cover the pork in an oven-safe dish and place in a preheated 300° F oven until it’s warmed through, and the center reaches 165° F, which can take quite a while depending on the size.
- Crockpot: Place the pulled pork back in the slow cooker with some BBQ sauce or a little water and turn on low until it is warmed through.

If you love this pulled pork is perfect for making ahead of time and having lots of leftovers to use up later. And if you love pulled pork, you should definitely give BBQ pulled chicken a try!
Side Dishes with Pulled Pork
As delicious as the pulled pork is on its own with a little sauce, the sides are what really make the experience.
- Creamy Coleslaw – Absolute classic side for pulled pork and if you’re making sandwiches.
- Baked Beans – These bacony beans are a crowd pleaser and can also be made in the smoker.
- Potato Salad – A cold potato salad is a wonderful contrast to the hot dishes.
- Macaroni Salad – It’s a creamy contrast with the crunch of crisp veggies.
- Arugula Salad with a lemon vinaigrette – Great for making pulled pork bowls.
- BBQ Sauce Vinaigrette – You made the sauce and can easily make it into a salad dressing that is perfect on top of fresh greens to make pulled pork salad bowls..
Leftover Inspiration
When you have lots of leftover pulled pork recipes, the only question is what you should do with it. The possibilities are pretty much endless. Some of my favorite options include pulled sandwiches, nachos, pizza, and you can make it into a quick ragu to serve over pasta or polenta.
More Delicious Pork Recipes
Pulled Pork
Equipment
Ingredients
- 4 to 8 pound pork shoulder or pork butt (See note #1.)
- 2 tbsp canola or vegetable oil (or more if searing before slow cooking)
Simple Dry Rub
- Diamond Crystal kosher salt (See note #2.)
- 2 tbsp packed brown sugar
- 2 tbsp smoked paprika
- 1 tbsp dark chili powder
- 1 tbsp ground black pepper
BBQ Sauce
- 1 1/2 cups ketchup
- 2 tbsp molasses
- 2 tbsp Worcestershire sauce
- 1/4 cup cider vinegar
- 1/2 tsp hot sauce (optional)
- 1/4 tsp salt
- 1/4 tsp pepper
- 3 tbsp brown sugar (can substitute regular sugar, maple syrup or honey)
- 1 tsp liquid smoke (optional for smoky flavor)
Instructions
Prep and Dry Brine (24 hours in advance)
- While the pork is cold, use a sharp knife to slice a 1-inch crosshatch pattern in the fat cap, being careful not to slice into the flesh. To speed up the cooking time, you can slice the pork in half.
- Place the pork on a sheet pan, pat it dry with paper towels and drizzle on a little neutral oil, rubbing it all over with your hands. Combine the dry rub ingredients in a small bowl, and sprinkle evenly over all sides and crevices of the pork (starting with the bottom first and finishing with the fat cap).
- Cover with plastic wrap and refrigerate for 24 to 48 hours. (See note #3.)
- Remove from the refrigerator 1 hour before cooking.
In the Smoker
- Preheat your smoker to 250° F and set up for indirect heat cooking with apple or cherry wood for smoke and a drip pan filled with water in place, according to the manufacturer's instructions.
- Smoke the pork shoulder by placing it in the smoker, fat side up, and cooking until the internal temperature reaches 165° F. Tightly wrap the pork in aluminum foil, then place it back in the smoker and continue to cook until the internal temperature climbs to 203° F, about 60 to 90 minutes per pound (depending on the size of your pork butt).
- Remove from the smoker and rest for 1 hour in foil, before unwrapping and shredding.
In the Crockpot or Slow Cooker
- Sear the pork. Heat a large skillet over medium-high heat with about 1 tablespoon of canola oil. Place the pork in the skillet, searing for about 2 minutes per side, being careful not to go too long as the sugar and spices can burn. (See note #4.)
- Place the pork in the slow cooker on the low setting, cover and cook until the internal temperature reaches 203° F, 5 to 8 hours. I will begin checking the temperature at about 5 hours.
In the Oven
- Preheat your oven to 250° F (or the lowest temperature your oven will go) with the rack in the lower middle position. Line a baking sheet, deep rimmed sheet pan or Dutch oven with foil and use a wire rack.
- Place the pork fat cap side up on the wire rack. It's best to keep the meat off of the bottom of the roasting vessel for more even cooking.
- Place the pork in the oven and roast until the internal temperature reaches 165° F. Tightly cover the roasting pan with aluminum foil, and then place it back in the oven and continue to roast until the internal temperature reaches 203° F, about 60 to 90 minutes per pound.
- Remove from the oven and rest for 1 hour in foil, before unwrapping and shredding.
Make the Sauce While the Pork Rests
- Combine all the BBQ sauce ingredients in a medium saucepan over medium-low heat, whisking to dissolve the sugar. Reduce heat to low and simmer for 10 to 15 minutes, or until thickened slightly. Taste test and adjust by adding more sugar, vinegar, salt or hot sauce to your liking.
Shred the Pork
- While the pork is still warm, use two forks to shred the pork. Combine the super flavorful bark, fat cap and juicy shredded pieces and about 1 cup of the BBQ sauce to make the perfect combination.
- Serve it with more BBQ sauce on the side.
Notes
- Buy bone-in or boneless, no skin, but with the fat cap on. Figure 3/4 pound of uncooked meat per person, which will yield about 1/2 lb of cooked pulled pork per person, leaving enough for leftovers.
- Cut it in two if the pork shoulder is too large for however you are cooking it.
- Use 1 teaspoon Diamond Crystal kosher salt per pound or meat or 1/2 teaspoon Morton’s per pound.
- Dry brining for 24 hours will allow the salt to penetrate through the surface, bringing out even more flavor and making it more tender. If you don’t have time to dry brine, you can cook the pork right away.
- Since the Crockpot won’t brown the pork, we can sear it in a skillet to brown it, adding lots of flavor.
- Liquids/pan juices from cooking or what collects in the foil can be added back to the pork after shredding, if desired or it seems dry.
- Cook time will vary depending on the weight, thickness, fat content of the roast and your specific cooking device. It’s always best to cook by temperature, and not by time.



OMG, I cooked an 11 lb Boston butt in the oven with this recipe and even without sauce, IT’S THE BOMB!!! Now I want a smoker!
Just left a rating on your AMAZING pulled pork sandwiches. Used this recipe to cook up the pulled pork the day before our BBQ. Both great recipes that everyone was asking for.
Love how you made it the day before. That’s super smart. Easy to reheat and enjoy whenever you are ready.
Excellent overview. Anxious to try it out. Question: Is the 60-90 minutes per pound the time in the oven from 165 degree point (when covered and put back in) or total time from the start?
Hi Glenn. 60-90 minutes per pound is for the total cook time for the start. Totally depends on the size of your roast, so focus on the internal temperature. 🙂
It took me pretty much all day to cook my 11 lb roast with a bone. I think I put it in the oven at 3 pm, and it was done at 1 am, and I shredded it at 2 am. I couldn’t stop eating it while I did that, and just now, I heated some up in a frying pan, now it’s extra crispy, and I’m hoovering it down without sauce, I put some in the freezer, and I have enough to make all kinds of things this week. This is SO GOOD!