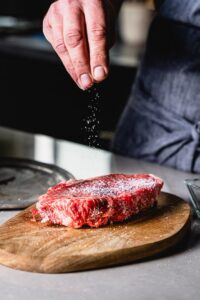
Want better-tasting meat that’s juicier, more flavorful and has a perfect crust? Start dry brining. It’s one of the simplest yet transformative techniques that can dramatically enhance both the taste and texture of your proteins with almost no effort. You are already salting your proteins, just change when you do it!
All you do is salt your meat ahead of time and let it hang out in the fridge – but there’s some cool science happening behind this simple technique.
Watch the Video
Quick Summary
What is Dry Brining? Salting meat ahead of time (24-48 hours) and letting it rest uncovered in the fridge.
Why Should You Do It?
- Better flavor throughout
- Juicier meat
- Superior browning/crust
- Almost zero effort
Time Investment:
- Active time: 2 minutes
- Waiting time: 1-48 hours (depending on cut)
The Science Behind Dry Brining
When you salt meat, two important things happen. First, the salt draws moisture out to the surface. But instead of making your meat dry, this moisture dissolves the salt and creates a concentrated brine on the surface. Through osmosis, this salty liquid gets reabsorbed into the meat, carrying flavors deeper than surface seasoning ever could.
And, the salt also works on proteins inside the meat, helping them retain more moisture during cooking. Think of it like teaching your meat to hold onto its juices better when it hits the heat.
Key Benefits of Dry Brining
Deep Flavor Throughout
Unlike seasoning right before cooking, dry brining ensures your meat is flavored from edge to edge. Every bite is properly seasoned, not just the outside.
Juicier Results
The modified proteins hold onto moisture better during cooking. This means your meat loses less moisture when cooking, staying juicier even if you accidentally cook it a bit too long.
Better Browning and Crust
By letting the meat sit uncovered in the fridge, the surface dries out. When it comes time to cook it, the meat will sear rather than steam, which will result in better browning and much more flavor development.
How to Dry Brine
- Place meat on a wire rack over a sheet pan.
- Salt all sides evenly (giving it an even dusting that likely looks like more salt than you would normally use).
- Place it in the fridge, uncovered for 24 to 48 hours (depending on the size and thickness of the protein).
- Cook as normal – no need to rinse off the brine.
How Much Salt to Use
There are a few methods for how much salt to use when you dry brine. You can go with the technical 1 to 1.5 % by weight ratio rule. This means that you will take the weight of the protein and use about 1 % by weight of sodium.
You can use this handy dry brining salt calculator to easily figure out based on what you are dry brining and what type of salt you will use.
In daily practice though, it’s easier and more practical to use the visual amount method. Kenji López-Alt has a good visual to keep in mind when applying a dry brine, which is what a fresh “snow flurry looks like on a parking lot.” This works when using Diamond Crystal Kosher Salt (which is my preferred salt to use), but wouldn’t work if you are using table salt (not recommended anyway).
You can learn more about the different types of salt, and how they measure out differently in my salt 101 guide.
What Can You Dry Brine
There isn’t much that won’t benefit from dry brining. Steak, whole chickens, chicken parts (breasts and thighs), large cuts of meat like a rib roast or pork shoulder, even salmon and other fish will benefit.
Common Mistakes to Avoid
- Using the Wrong Salt – Don’t use table salt or fine sea salt – they’re too concentrated and can make your meat too salty. Stick with kosher salt (preferably Diamond Crystal brand) for its larger flakes and better distribution.
- Covering the Meat – Wrapping the meat in plastic or covering it prevents the surface from drying out. A dry surface is crucial for getting that perfect brown crust. Leave it uncovered in the fridge.
- Not Giving It Enough Time – Salting right before cooking isn’t dry brining – it’s just seasoning. Give the salt time to work its magic. Even an hour is better than nothing for thin cuts.
- Using Too Much Salt – While dry brining needs more salt than regular seasoning, you can overdo it. If you can’t see the meat through the salt, you’ve gone too far. Think “light snow” not “blizzard.”
- Rinsing After Brining – Don’t rinse the salt off before cooking! The salt has been absorbed, and any remaining on the surface will help create that perfect crust.
- Not Using a Rack – Placing meat directly on a plate or container bottom prevents air circulation and will prevent all sides from fully drying out. Always use a wire rack over a sheet pan for even drying.
Pro Tip: Make it Part of Your Routine
When you bring a piece of meat or a chicken home from the store, get in the habit of dry brining it right away. That whole chicken or steak is going to be so much better in a day when its time to cook it rather than just salting it right before cooking. It’s a great thing to start doing that will make your food better with really no extra effort.
Dry Brining vs. Wet Brining: What’s the Difference?
Both dry and wet brining use salt to enhance flavor and moisture retention, but they work differently:
• Dry Brining: Involves coating the protein with salt and letting it rest uncovered in the fridge. The salt draws out moisture, dissolves, and reabsorbs, seasoning deeply without adding liquid. It also dries the surface, leading to better browning and a crisp crust.
• Wet Brining: Submerges the protein in a saltwater solution (usually with sugar as well), adding moisture and seasoning throughout. It actually adds moisture to the meat, which can somewhat dilute the flavor and soften the meat’s texture.
Key Difference: Dry brining enhances flavor and texture with better crust formation, while wet brining focuses more on adding moisture— which is great for lean meats like turkey.
Would you like to save this?
More Tips & Guides
With all the ways to enjoy the pork, here are a few really delicious ways.